In this blog, we will have a look at how to set up an application to send and receive STOMP messages over a WebSocket connection. Spring Boot 2 will be used as it contains support for STOMP and WebSocket, and it provides a simple message broker as well.
Before we dive into the examples, let us elaborate a bit more about the concepts mentioned above.
Connections over websocket
According to the WebSocket RFC, the WebSocket protocol enables two-way communication between a client running untrusted code in a controlled environment to a remote host that has opted-in to communications from that code. So, what does this statement mean? In short, WebSockets creates a connection between client and server which allows sending messages back and forth between client and server without having to reopen the connection or using long-polling for updates from the server.
So once the WebSocket connection is established, it remains open and allows data to be transferred. This is a major benefit of a WebSocket over a traditional HTTP request, which needs to reopen the connection and send a bunch of headers and cookie data to successfully complete the request, this overhead is reduced and even eliminated.
Data is transferred through a WebSocket as messages containing the payload, which consists of one or more frames. A frame consists of a header and body, of which the header describes the frame and application data in the body. The frame-based system reduces the non-payload data to a minimum and significantly reduces latency, thus allowing the transfer of data in a very fast and reliable way. This keeps things running smoothly in a fast paced environment.
Setting up a WebSocket connection
To set up a WebSocket connection, a traditional HTTP request is sent to the server containing an “Upgrade” header. If the server supports the protocol, it performs the upgrade by adding an “Upgrade” header in the response. As a consequence, the socket is now opened and allows for “real-time” communication between client and server. Note that after this handshake, the initial HTTP connection is replaced with a WebSocket connection. WebSocket URLS use the ws scheme and the wss scheme for regular and secure connections, respectively.
The machine in the middle: a Message broker
A message broker is an architecture pattern that mediates communication between applications.
The most simple visualization of a message broker is the central nervous system, connecting subsystems together on one big network. The message broker is responsible for receiving and sending messages, routing them to the correct destination and translating messages between standard messaging protocols, more on this later.
The main benefit of using a message broker, instead of interfacing systems directly, is that the handling of the flow of data is being handled not by the system itself. The message broker serves as an intermediary between other systems, allowing senders to send messages without knowing where the receivers are, how many receivers there are, or even having to worry if the messages will be received. The message broker guarantees to deliver the message by relying on messaging queues that store and order the messages until these are consumed by the applications.
Most known implementations of a message broker are Apache Kafka and RabbitMQ. More resources can be found at the end of this blog.
Simple text orientated messaging over WebSocket? STOMP!
WebSocket is a messaging architecture that does not mandate any specific messaging protocol. It transforms a stream of bytes into a stream of messages. The application itself needs to interpret the meaning of each message. For this reason, the WebSocket RFC defines the use of sub-protocols, allowing applications to choose a message format that both client and server will understand. This format can be custom, framework-specific, or a standard messaging protocol.
One example of a standard messaging protocol is STOMP.
STOMP stands for Simple (or Streaming) Text Orientated Messaging Protocol. It provides an interoperable wire format in order to enable clients to communicate with message brokers, as long as they both understand STOMP. Using STOMP thus allows widespread messaging among many languages, platforms and brokers.
STOMP defines a handful of frame types that map to WebSocket frames:
- CONNECT: a frame used by the client to initiate the stream to the server
- SUBSCRIBE: a frame used to register a subscription on a given destination. Messages sent to this destination will be routed to all active subscriptions on this destination
- UNSUBSCRIBE: a frame used to remove an existing subscription. Once removed, the client will no longer be among the receivers of messages send to the destination;
- ACK: a frame used to acknowledge the consumption of a message from a subscription, removing the message from the message queue if supported
- SEND: a frame used to send a message to a specific destination in the messaging system. It consists of the required header “destination” which indicates where to send the message; the body of the frame is the message to be sent.
These frames / commands allow management of the transfer of messages between client and server. Note that the WebSocket connection itself is not directly maintained with STOMP, but by the WebSocket client itself. Thus the WebSocket connection remains open as long as the client and/or server do not disconnect from the WebSocket connection. The STOMP client will handle the frames with instructions sent over the WebSocket connection to server and client.
Example application with Spring Boot 2
We will use Spring Boot 2 to expose STOMP endpoints for the WebSocket handshake and to send and receive the messages on. Spring’s simple message broker will be used to handle encoding and decoding the messages and managing client subscriptions.
Getting started
To use Spring Framework’s Websocket support, the Spring Boot starter can be included in the project.

Server-side configuration and implementation
Configuration
Add a configuration class like the following:
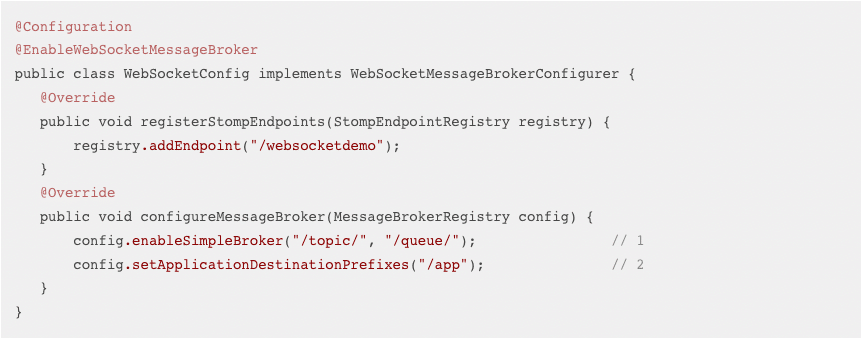
We’ll quickly break down the code-snippet above:
@EnableWebSocketMessageBroker will enable broker-backed messaging over a WebSocket connection.
registerStompEndpoints allows the configuration of the HTTP URL as the endpoint for the WebSocket handshake. Hence, an endpoint /websocketdemo will be made available for the client to send a HTTP request to upgrade the connection to a WebSocket connection.
configureMessageBroker is configured to allow for two things to happen:
- The Spring built-in message broker for subscriptions and broadcasting as well as a route for messages whose destination prefixed with “/topic” or “/queue” to the broker will be enabled. The topic destination will be used for routing public messages, and the queue destination for private messages. Note that it is not required that the queue destination is strictly for private messages, and topic for public messages. This convention is optional.
- Define a prefix app. Messages whose destination prefixed with “/app” are routed to the @Controller methods annotated with @MessageMapping.
For example, if a client sends a message to “/app/message”, the controller method annotated with “/message” will be invoked.
In the example above a simple broker is configured. To configure an external broker, refer to the Spring Framework documentation.
Handling messages
A sample controller can be added to handle messages. In the code snippet below, a sample controller handling messages routed to destinations with the prefix “/app” is depicted.
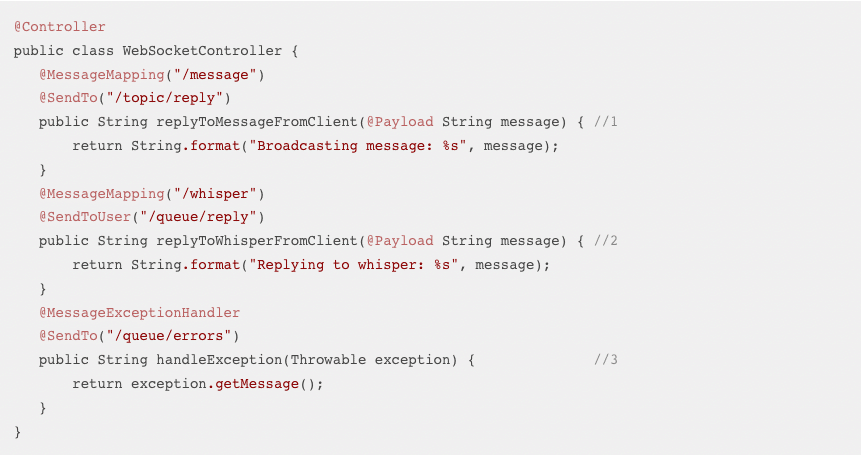
The controller in the code snippet above has the following functions:
- Handling messages routed to the “/app/message” destination, by prefixing them and returning them to the “/topic/reply” destination, broadcasting them to all connected clients.
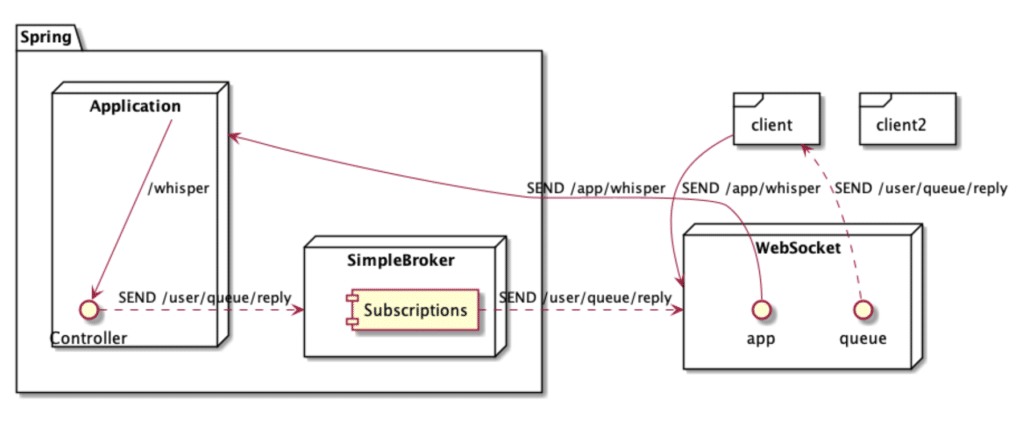
- Handling messages routed to the “/app/whisper” destination, only replying to the connected sender on the “/user/queue/reply” destination, even though multiple clients can be connected to this destination.
- Handling any exceptions from the @MessageMapping methods and sending them to the “/queue/errors” destination.
Note that all response routing is done with annotations. When desired, the Spring provided SimpMessagingTemplate can be used to send messages to connected clients from anywhere in the application.
A stream of messages
The following diagram demonstrates the flow of messages in the application using the simple built-in broker from the code snippet in the previous section. Image credits: Spring framework documentation.
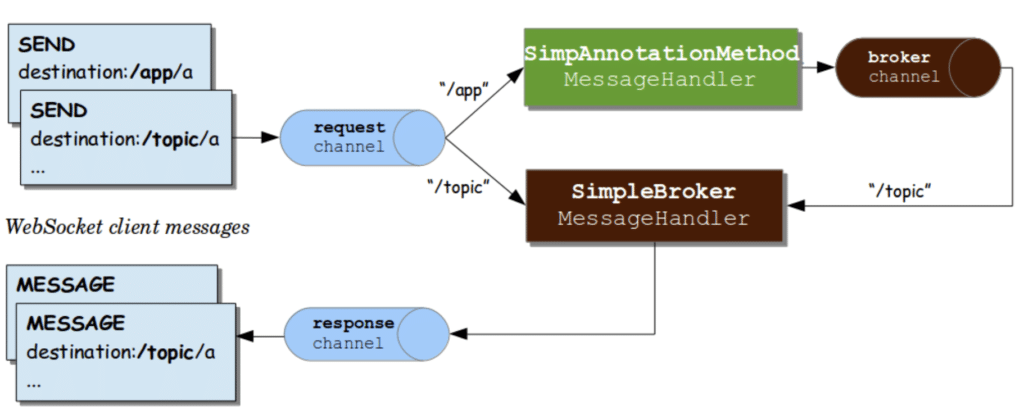
When messages are received over the WebSocket connection, they are decoded to STOMP frames and transformed into Spring-message-representations. These Spring messages are then sent to the channel for further processing.
In the described example configuration of the Spring application, STOMP messages sent to the destinations “/topic” and “/queue” are routed directly to the message broker, while “/app“ messages may be routed to the service to be handled by the controllers.
The controller method mapped via the @MessageMapping annotation is invoked, will process the payload of the Spring message and respond by sending a Spring message to the SimpleBroker via the broker channel to the connected clients on the topic and queue destinations. The SimpleBroker will make sure the correct subscription(s) will receive the message, based on the destination the message was sent to.
After a WebSocket connection is established by the client by sending a HTTP request with “Upgrade” header to http://localhost:8080/websocketdemo, any of the following examples is supported by the implementation in the application described in the previous section.
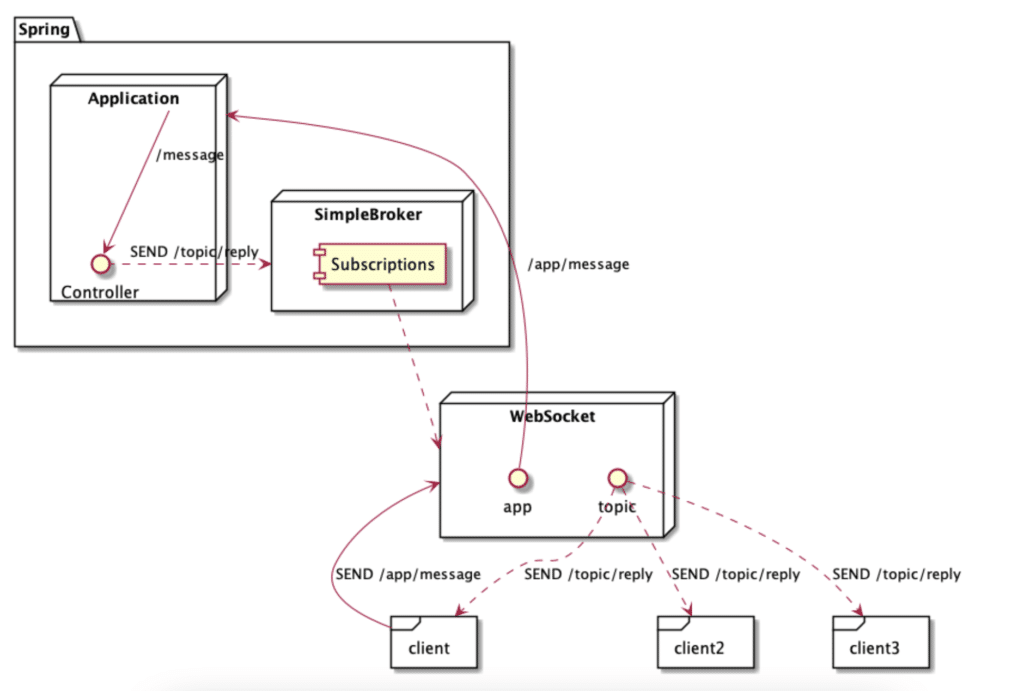
Example: Client sends a message to the service, the service broadcasts a reply to all subscribed clients, including the original sender.
- The client sends a SUBSCRIBE frame with a destination header of ”/topic/reply”. Once received and decoded, the message is routed to the message broker, which will store the client subscription.
- The client sends a SEND frame to the “/app/message” destination. The “/app” prefix is stripped and the controller method annotated with the remaining “/message” part will be invoked.
- The return value of the method is turned into the payload of a Spring message, which will be sent to the message broker on the “/topic/reply” destination.
- The message broker finds and sends a message to all matching subscriptions. The Spring message is encoded as STOMP frames and sent over the WebSocket connection.
Alternative example: Client sends a message to the service, which will reply only to the original sender over the WebSocket connection.
- The client sends a SUBSCRIBE frame with a destination header of ”/queue/reply”. The message broker will once again store the client subscription.
- The client sends a SEND frame to the “/app/whisper“ destination and the annotated method in the controller is invoked.
- The return value is sent to the message broker on the “/user/queue/reply“ destination.
- The message broker will find the correct client subscription and only send the message on that WebSocket connection, only replying to the client which sent the message.
Final thoughts
We hope this blog provides sufficient information to get started with configuring your own WebSocket connections, transforming your messages to STOMP and handling messages with Spring Boot 2.
More information can be found using the following resources:
Message Broker
- https://www.ibm.com/cloud/learn/message-brokers
- https://en.wikipedia.org/wiki/Message_broker
- https://www.rabbitmq.com/
- https://kafka.apache.org/
WebSockets
- https://tools.ietf.org/html/rfc6455
- https://www.geeksforgeeks.org/what-is-web-socket-and-how-it-is-different-from-the-http/
- https://sookocheff.com/post/networking/how-do-websockets-work/
- https://www.baeldung.com/websockets-spring
Stomp
Spring Boot With WebSocket and STOMP
- https://www.toptal.com/java/stomp-spring-boot-websocket
- https://docs.spring.io/spring-framework/docs/current/reference/html/web.html#websocket
Article written by Sey Vaneerdewegh.

